Hi All,
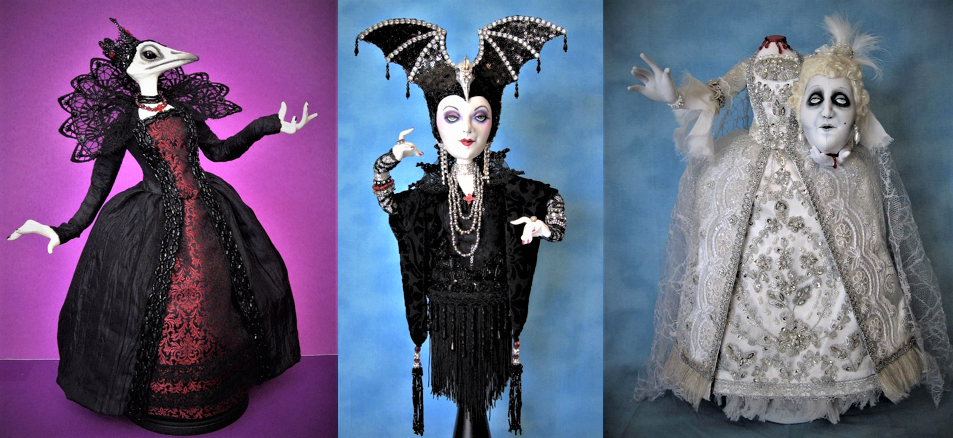
Once again, I am attempting to learn how to sculpt a polymer clay head. I took another (zoom) class with Maureen Peck Carlson of Wee-Folk (Maureen Carlson weefolk.com) This was my second face sculpting class with Maureen, who is a dear woman, a great teacher, and very funny. In the past, I've also taken sculpting classes with Jack Johnston and Mark Dennis.

In my first class with Maureen, I sculpted a small (2-1/2 inch) witch head. I struggled with sculpting a head that small.

So, this time I sculpt a bigger head (4 inch) and the results were much better for me. The finished piece is about 15 inches tall, including candlestick and feathers.
Polymer clay is a new medium for me. (In the past, I sculpted with Paper-Clay to make doll masks on cloth heads) I'm still learning about polymer and how to bake and paint it. I had a half brick of "Living Doll" Sculpey clay and a half brick of "Cos Clay" (both left over from previous classes). Neither was enough clay for the class, so (after researching to make sure these would work together) I blended the 2 clays together & had enough clay.
I started with a foil egg-shape about 3-1/2 inches long, with a wire neck armature (also wrapped in foil). It's easier to sculpt a face if you have a neck to hold on to. I used 14mm glass eyes (from HeartofaFairy) I spent the 2 days of class sculpting the face. I was using some photo references of older women to help me sculpt. Before I started, I had the concept of a grand older woman who wore too much make-up and living in the past. I hoped it would look slightly comical and yet a bit tragic.

I baked the face in a foil pan resting on a bed of quilt batting (covered in more foil). After the face cooled and hardened, I sculpted the back of the head and baked. Then the neck. And, after adding more foil to the neck armature to make shoulders, sculpted & baked the bust.

To get the bust set in the resin candlestick, I made sure there was enough wire neck armature to go inside the cup of the candlestick. Wrapping the wire armature in more foil, I mixed 2-part Apoxie clay and covered the foil armature & pushed the clay and armature into the candlestick, blending the Apoxie up into the polymer. The Apoxie clay sticks to whatever it's touching while it hardens (about 12 hours). Now I had a solid sculpted bust securely attached to the candlestick.

The next step was painting. To highlight all the wrinkles I had sculpted, I mixed extender medium with acrylic paint, just a shade darker than the clay color. I did a wash over the face and neck, wiping away most of the paint before it dried. This left the paint in the wrinkles. I continued to do thin washes of paint over the face, using darker colors and less paint as I went, wiping away the paint with a cloth. (This technique of painting then wiping away, leaving paint in recesses & cracks, is sometimes called "antiquing"). I used different shades of tan and pink. I went back and added some age spots here and there.

For the "make-up" blush and blue eye-shadow, I used pastel chalk, brushed on dry. I glued on false eyelashes, then trimmed them down a bit. I painted on black eyeliner around the eyes. I used red acrylic gloss paint for the lipstick. I even painted some red paint into the small wrinkles around the mouth. I noticed this detail of lipstick bleeding into the wrinkles in my photo collection. This reinforces the concept of an overly made-up older woman.
I sprayed the face with a THIN coat of Krylon workable fixative to set the chalk so it wouldn't rub off. (Be careful of adding any kind of finish coating to polymer clay and AWAYS do a test first! -- many products make the baked clay sticky!)
I stitched a fringe of orange mohair locks for the wig. I glued the fringe around the hairline, with the locks going down over the face and back. Then, pulled all the hair up into a knot on the back of her head. I used a felting needle to felt as much of the hair to itself to help it stay in place. Then sprayed it with several coats of hairspray.

Making the costume top was tricky for me, as you cannot pin or stitch into the clay body (unlike a cloth body!). I was able to machine stitch one side of the purple taffeta top but had to hand stitch the other side after pinning it on the torso. Some of the embellishments & trim had to be glued on if I couldn't stitch them on.